16+ Step-by-Step Guide
CONTENTS INTRODUCTION INDIVIDUAL ENTRY Intention Preferred Occupation Actual Notes MARK LEAVERS BULK ENTRY Search Settings Lock/Unlock Select Pupils Open in a New Tab Bulk Edit Individual Edit CUSTOM REPORTS SET UP To edit/view the 16+ tab in Records - Edit To access 16+ Bulk Entry in Admissions and Leavers #INTRODUCTION The Post 16 Education (Scotland) Act, and its associated subordinate legislation and statutory guidance, mandates certain partners to share data with Skills Development Scotland (SDS) for the benefit of young people. The data gathered is used to report on statuses of young people aged 16-19 for the Participation Measures (https://www.skillsdevelopmentscotland.co.uk/publications-statistics/statistics/participation-measure/?page=1&statisticCategoryId=7&order=date-desc) and supports the post school stats information on the Scottish Government Insight system for school leavers (https://www.allaboutschoolleavers.co.uk/). The data is also used by partners working together on the Youth Employment agenda to identify the range of opportunities required and, where applicable, procure appropriate provision (https://www.youthemployment.org.uk/). A fortnightly extract is provided by the 16+ Data Hub administered by SDS. The 16+ tab enables and standardises the collection of school pupil and school leaver information from all Local Authority schools, enabling an extract file to be created that is used to update via the 16+ Data Hub The purpose of this Step-by-Step Guide is to assist schools with the entering of 16+ Data to pupils' records. The guide covers entering data individually (per pupil) and in bulk. It also covers marking pupils as leavers. 16+ data feeds into New Custom Reports allowing central and school reporting on the data entered. #2. INDIVIDUAL ENTRY This allows the entry of data relating to a student's intended and actual activities when leaving school. - Application - Records - Edit - 16+ Tab 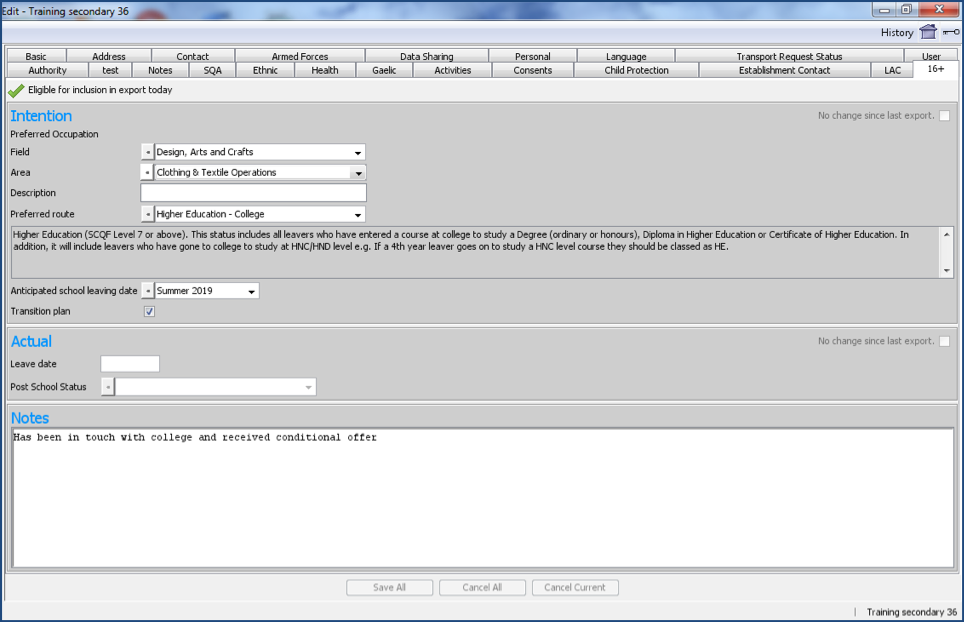
 The green tick indicates the selected pupil is eligible for inclusion in export today; this will be dependent on the date of birth, however it is still possible to enter data should the pupil not be eligible. If a pupil is eligible to leave early due to ASN/Young Carer needs this should be recorded in the Personal tab of their record. This will make them eligible for inclusion in export today. ##Intention The pupil's intended destination upon leaving school. Note check box. ‘No change since last export’ or, ‘Changed since last export’ at the top right of the screen. Ticking this will display differences between current and previously exported data ##Preferred Occupation 1. Select ‘Field’ from dropdown options 2. Select ‘Area’ from dropdown options (determined by selection from Field options) 3. Type in ‘Description’ if required (see below) 4. Select ‘Preferred route’ from dropdown options. The definition of the preferred route selected will appear in the box below. 5. Choose ‘Anticipated school leaving date’ (Summer/Winter) from dropdown options 6. Tick if pupil has a ‘Transition Plan’ (see below) 7. Enter Notes (bottom of screen) for the pupil 8. Click ‘Save All’, ‘Cancel All’ or ‘Cancel Current’
  As the Description field is a free text box, naming of occupations should be consistent to allow easier reporting e.g. if Draughtsman and Graphic Designer are both used, and the school creates a custom report, they will not be listed together The anticipated leaving date can be entered for up to three years from the current year. A Transition Plan is to help a young person with additional support needs make a successful transition from school. Transition plans may include looked after children. ##Actual Note check box. ‘No change since last export’ or, ‘Changed since last export’ at the top right of the screen. Ticking this will display differences between current and previously exported data This area becomes available when a pupil is marked as a leaver (pupils can be marked as leavers with dates in the future). The leaving date cannot be changed in this screen (fed from the Mark Leavers screen) although the Post School Status may be updated as required. The selection for 'Post School Status' will determine the available choices beyond that.
 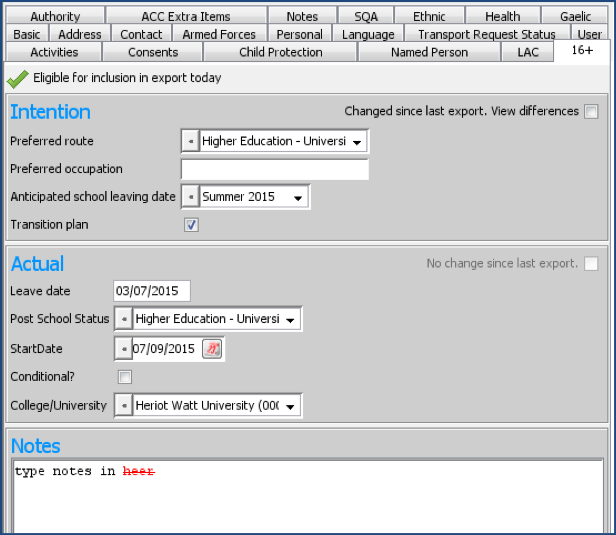 ##Notes Any relevant information can be entered to the Notes section at the bottom of the screen. It is recommended that the source of information is recorded together with the Initials of who was told and date of entry e.g. 'Source from Parent DHT 26/09/18'. Notes are not included in the transmission to 16+ Data Hub. The Notes section here is not the same as the Destination Note recorded in the Mark Leaver screen. Incorrect spelling will be highlighted in red with a line through the word. A right click on text will offer replacement value. #3. MARK LEAVERS When a pupil leaves school it is important that the information is entered to SEEMiS as soon as possible. The entry of a 'Leaving Date' will activate the 'Use Preferred Route' and the 'Post School Status' options. If data has been entered under the Records \> Edit \> 16+ tab, this will be automatically populated into the 'Use Preferred Route' section. If no data was entered then the 'Use Preferred Route' and 'Post School Status' options will be disabled and, if known, the details should be updated on the 16+ tab. Education and Employment will produce different fields when the Post School Status is selected. - Application - Admissions & Leavers - Leavers - Mark Leavers
 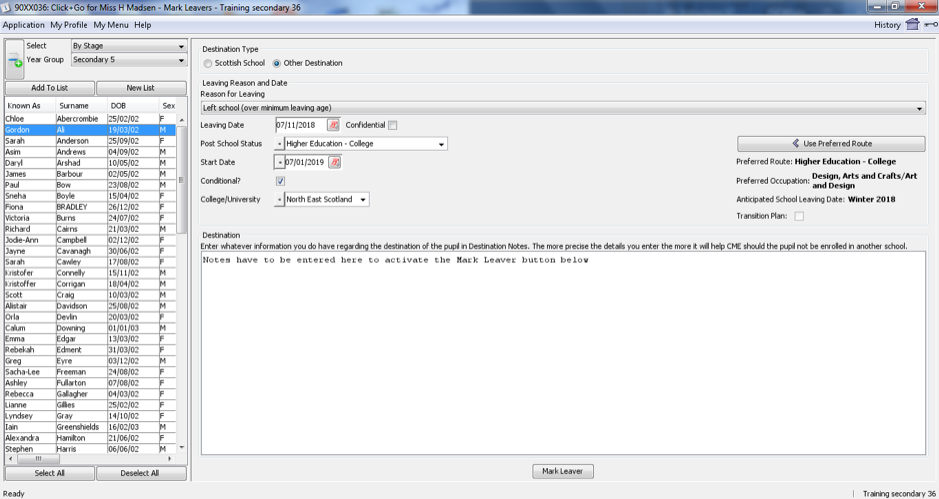 1. Select and filter 2. Click 'New List' 3. Select pupil over 16 4. Choose 'Other Destination' as Destination Type 5. Enter 'Left School (over minimum leaving age)' as Reason for Leaving 6. Enter appropriate 'Leaving Date' 7. If pupil already has information enteredfor preferred route, click 'Use Preferred Route' (if that is still intention) or, enter 'Post School Status' ('Post School Status' is a chance to enter Actual, but in this screen) 8. Enter the anticipated 'Start Date' 9. Enter any additional information as necessary. Options will depend on what is selected for 'Post School Status'. 10. Enter any relevant notes in the 'Destination' field. 11. Click 'Mark Leaver' Notes must be entered in the 'Destination 'field to activate the Mark Leavers button as there is a mandatory requirement to enter text here. This notes field is not the same as the notes tab in Records \> Edit Return to the 16+ Tab under Records > Edit. The Actual ‘Leave date’ and other details that have been entered on the Mark Leavers screen will now be visible If a pupil is cancelled as a leaver, the intended information will be saved but will be cleared from the Actual information #4. BULK ENTRY Bulk entry allows the 16+ information such as 'Field', 'Area' and 'Preferred Route' to be entered on a bulk basis for a range of selected pupils. Changes made to this screen will update the 16+ tab information held under Records \> Edit, including the Notes area. - Application - Admissions & Leavers - 16+ - Bulk Entry ##Search 1. Click 'Search' 2. Use 'Filter By' and 'Search By' options to select a range of pupils or an individual pupil 3. Click Add to List to display the pupils
 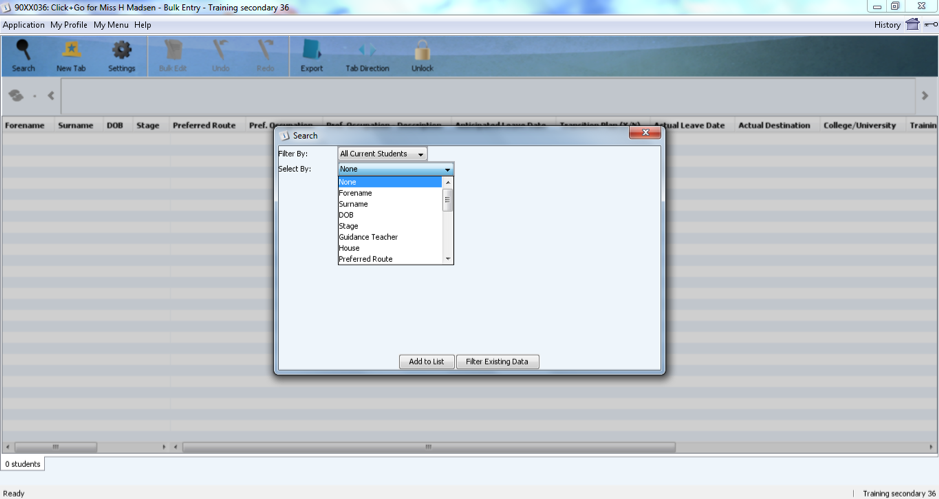 ##Settings The 'Settings' icon allows selection of columns displayed on screen. 1. Select 'Settings' 2. Tick options to be displayed 3. Click 'Apply'
  The option to ‘Use Short Field Names’ will abbreviate column headings, making all the columns more easily viewed on screen. There is free text 'Notes' available for editing in the last column. It may already contain text. This data comes from the Notes area in Records \> Edit \> 16+ tab (not Destination Notes in the Cancel a Leaver screen). Text enterered in the bulk entry Notes area will then feed back in to the Notes area in Records \> Edit \> 16+ tab ##Lock/Unlock Before the Edit option becomes available, the 'Lock' icon (padlock) at the top of the screen must be set to the unlocked position. ##Select Pupils 1. Click under the column to be edited for the corresponding pupil(s) while holding down the CTRL key. Alternatively, click and drag, or use the shift or shortcut keys, across the required range 2. The selected pupils will be highlighted with a blue box around them 3. Right click over the selected pupil(s) and select the option to either 'Open in a New Tab' or 'Bulk Edit'
 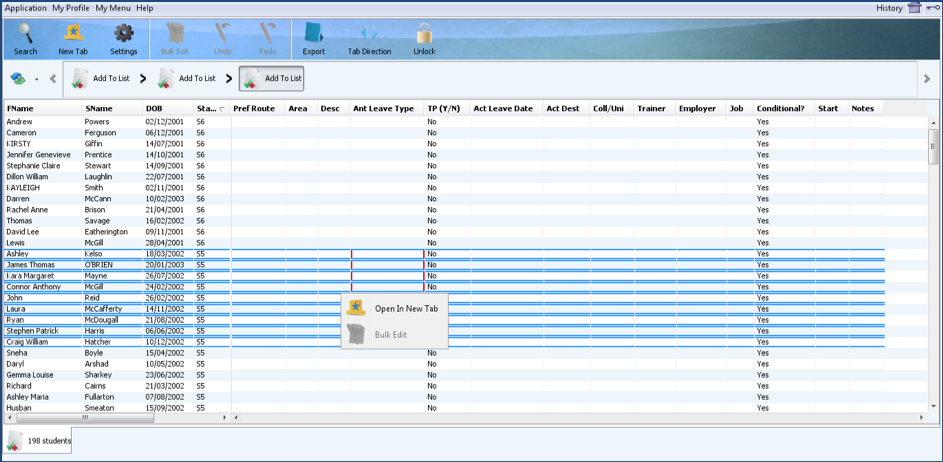 The option to ‘Use Short Field Names’ will abbreviate column headings, making all the columns more easily viewed on screen. There is free text ‘Notes’ available for editing in the last column. It may already contain text. This data comes from the Notes area in Records > Edit > 16+ tab (not Destination Notes in the Cancel a Leaver screen). Text enterered in the bulk entry Notes area will then feed back in to the Notes area in Records > Edit > 16+ tab ##Open in a New Tab If the option to 'Open in a New Tab' is selected, or if the 'New Tab' icon is selected from the top of the screen while pupils are highlighted on a list, the selected pupils will be extracted to a separate tab. Move between tabs by clicking on the appropriate tab in the bottom left-hand corner. This will also show the number of students in the selection.
 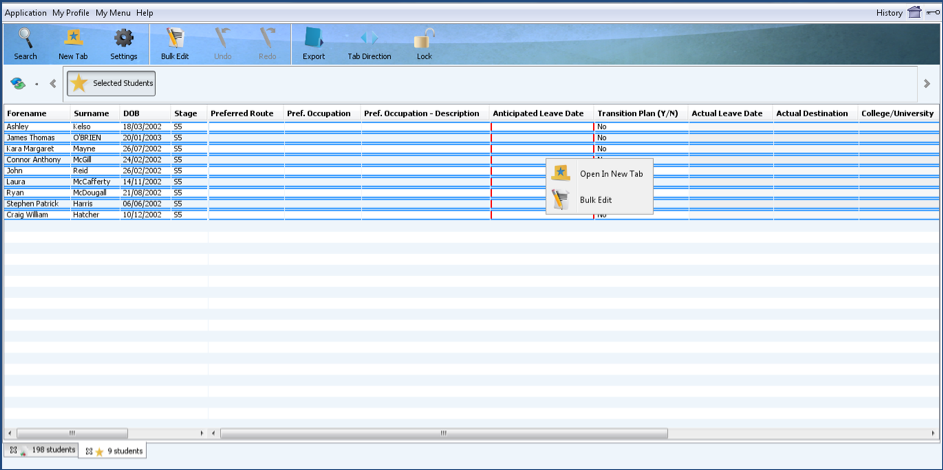 ##Bulk Edit To Bulk Edit or amend 16+ choices for the selected group of pupils. 1. Under the column that is to be edited, highlight the pupils to be changed 2. The selected pupils will show with a red outline at the sides of the column to be changed 3. Right click on highlighted rows and select 'Bulk Edit' option or chose the 'Bulk Edit' icon from the top of the screen 4. Depending on which column has been selected, the options will be displayed to enable a bulk edit 5. Select the appropriate value and click on 'Apply' 6. 'Undo'/'Redo' can be used where required
 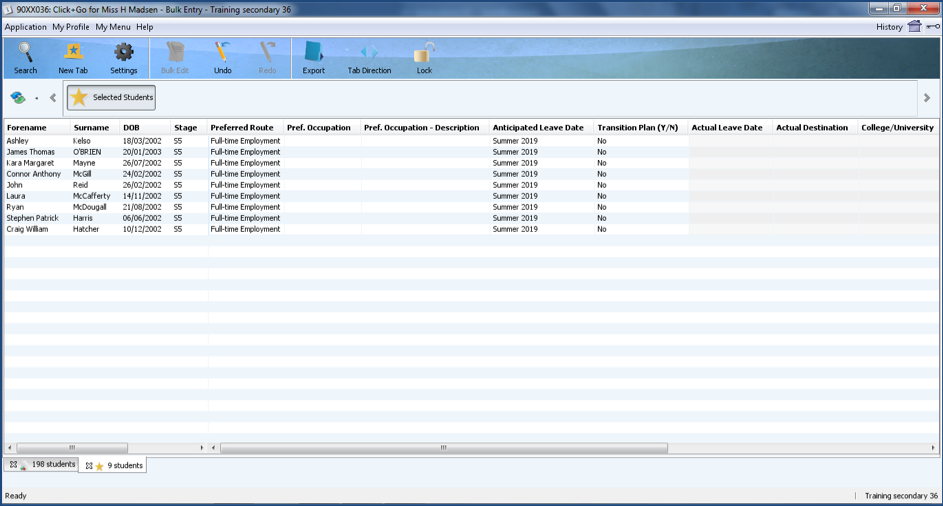 The following columns have pre-set values to choose from: ‘Preferred Route’, ‘Pref. Occupation’, ‘Anticipated Leave Date’, ‘Transition Plan’. The following columns are free text entry: ‘Pref. Occupation’ – ‘Description’; ‘Notes’ The **Actual Leaving Date_* cannot be updated from this screen. Columns that are greyed out when unlocked for editing are completed when marking pupils as leavers. ##Individual Edit To edit an individual pupil, double click on the pupil, under the appropriate column. Options will then appear for the selected column. Records \> Edit \> 16+ tab can also be used to edit the pupil's 16+ choices. #5. CUSTOM REPORTS The 16+ fields can be used to report on any of the 16+ categories and allows users to group together pupils by category e.g. pupils who are going to the same destination or who plan to leave on the same date. - Application - Reports - New Custom Reports The naming of the ‘Preferred Occupation - Description’ field should be consistent to allow easier reporting e.g. If Draughtsman and Graphic Designer are both used, and the school creates a custom report they will not be listed together. #6. SET UP Users will require the appropriate access. ##To edit/view the 16+ tab in Records > Edit: 1. Go to Application > Data Utilities > Access control \> Edit User Profile and make sure their profile has access to Records \> Edit 2. Go to Application > Data Utilities > Access Control \> Edit Data Settings. Click on the Record Access Tab and change the 16+ tab from none to edit / view depending on the access requirements of the user ##To access 16+ Bulk Entry in Admissions & Leavers: 1. Go to Application \> Data Utilities \> Access Control \> Edit User Profile and make sure the user profile has access to Bulk Entry in the 16+ folder
Was this article helpful?